


Polycarbonate Roof Screws: A Comprehensive Guide to Installation, Types, and Best Practices

What Are Polycarbonate Roof Screws?
Polycarbonate roof screws are specialized fasteners used to attach polycarbonate roofing sheets to supporting structures. Polycarbonate is a popular roofing material due to its strength, transparency, and excellent insulation properties. However, it requires screws that can handle the material’s unique characteristics, such as thermal expansion and contraction, as well as exposure to UV radiation. These screws ensure a secure fit and are resistant to corrosion, making them ideal for long-lasting roofing solutions.
Unlike regular roofing screws, polycarbonate roof screws are designed with specific features to accommodate the thermal expansion of polycarbonate sheets. They are often made with a rubber washer to prevent leaks and are corrosion-resistant, ensuring the longevity of the roof. Additionally, the head of the screw is designed to distribute the pressure evenly, preventing cracking or damage to the polycarbonate sheets.
Types of Polycarbonate Roof Screws
Polycarbonate roof screws come in several types, each designed for specific applications. Understanding the differences between these screws will help you choose the right one for your project. Here are the most common types of polycarbonate roof screws:
1. Self-Drilling Screws
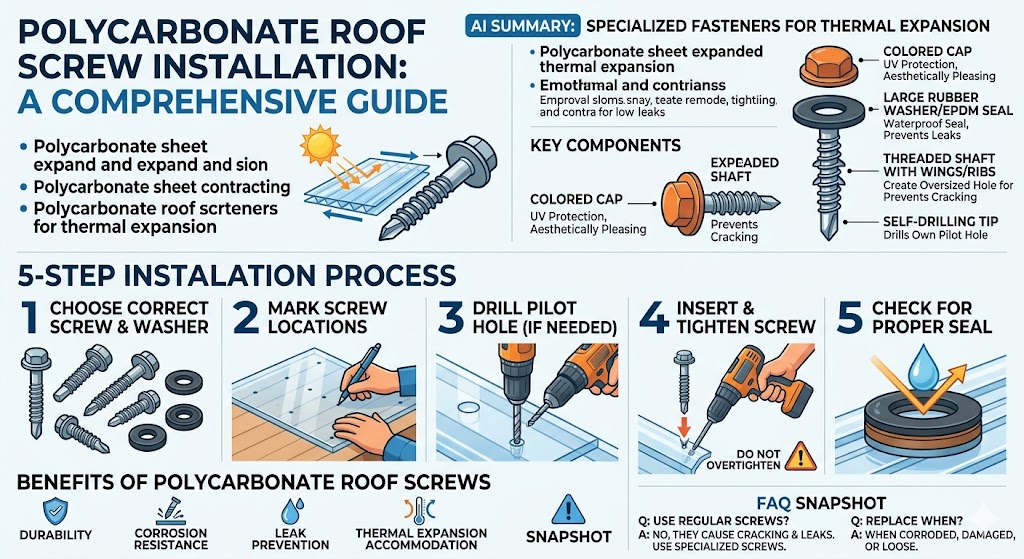
Self-drilling screws are the most commonly used screws for polycarbonate roofing installations. They are designed to drill their own hole into the polycarbonate material and the underlying support structure, such as wood or metal. This eliminates the need for pre-drilling holes and speeds up the installation process. These screws are typically equipped with a corrosion-resistant coating and a rubber washer to ensure a tight, waterproof seal.
2. Cap Screws
Cap screws feature a larger head designed to cover the hole in the polycarbonate sheet, providing additional protection from the elements. The rubber washer beneath the cap helps create a waterproof seal and prevents any leaks. These screws are typically used when extra sealing or a more aesthetically pleasing finish is needed. They are particularly useful for installations where the polycarbonate roofing sheets are subject to heavy rainfall or high winds.
3. Threaded Rods
Threaded rods are used for more permanent polycarbonate roofing installations. These screws are longer and have threads along their entire length, allowing them to secure the polycarbonate sheets to metal or wood frames. They are typically used in situations where the roofing structure needs to be reinforced, such as in areas with high winds or heavy snow loads.
4. Silicon-Sealed Screws
Silicon-sealed screws are designed with a silicone sealant around the threads, providing an extra layer of protection against water infiltration. These screws are ideal for environments where the roof is exposed to extreme weather conditions, such as heavy rain or humidity. The silicone seal ensures that no water can enter the structure, providing additional durability and preventing damage to the roof.
How to Install Polycarbonate Roof Screws
Proper installation of polycarbonate roof screws is crucial to ensure the longevity and effectiveness of the roofing system. Here’s a step-by-step guide to help you install polycarbonate roof screws correctly:
1. Choose the Right Screws
Select the appropriate type of polycarbonate roof screw based on your roofing material, the weather conditions, and the strength required. Make sure to choose screws with corrosion-resistant coatings and rubber washers to prevent leaks and ensure durability.
2. Mark the Screw Locations
Before drilling the screws into the polycarbonate sheets, mark the locations where each screw will be placed. Make sure the screws are evenly spaced and positioned to ensure a secure attachment. Typically, screws should be placed about 12 to 18 inches apart, depending on the size of the roof sheets.
3. Drill Pilot Holes (If Necessary)
If you are using screws that require pilot holes (such as threaded rods), drill the holes in the marked positions. The holes should be slightly larger than the diameter of the screw to allow for thermal expansion of the polycarbonate sheet. Be sure not to drill the hole too wide, as this can affect the screw’s grip.
4. Insert the Screws
Place the screw in the hole and use a screwdriver or drill to drive it in. Be careful not to over-tighten the screw, as this can cause the polycarbonate to crack or warp. If the screw has a rubber washer, ensure that it makes a tight seal around the hole to prevent leaks.
5. Check for Proper Seal
After all screws have been installed, inspect each one to ensure that the rubber washers are properly seated and that the screw heads are securely fastened. Check for any gaps or loose screws, as these can lead to leaks or instability in the roofing system.
Benefits of Using Polycarbonate Roof Screws
Polycarbonate roof screws offer several advantages over regular roofing screws, making them an excellent choice for roofing installations. Here are the key benefits of using polycarbonate roof screws:
- Durability and Resistance to Weathering: Polycarbonate roof screws are designed to withstand extreme weather conditions, including high winds, rain, and UV exposure.
- Corrosion Resistance: These screws are coated to resist rust and corrosion, ensuring they maintain their strength and reliability over time.
- Easy Installation: Self-drilling and threaded rod screws make installation faster and easier, eliminating the need for pre-drilling in many cases.
- Leak Prevention: The rubber washers and silicone seals help prevent water infiltration, ensuring that your roof remains dry and secure.
- Thermal Expansion Accommodation: Polycarbonate sheets expand and contract with temperature changes, and polycarbonate roof screws are designed to accommodate this movement without causing damage to the material.
Maintenance and Troubleshooting Tips
To ensure the longevity and performance of your polycarbonate roofing system, regular maintenance is essential. Here are some tips to keep your roof in optimal condition:
1. Inspect Screws Regularly
Check the screws periodically for signs of wear or loosening. Tighten any loose screws and replace any that appear corroded or damaged. This will help maintain the integrity of your roof.
2. Clean the Roof Surface
Regularly clean the surface of the polycarbonate sheets to prevent the buildup of dirt and debris, which can block water flow and cause damage. Use a soft brush or sponge to avoid scratching the surface.
3. Check for Leaks After Heavy Rain
After a heavy rain, inspect the roof for any signs of leaks. If you notice water dripping or pooling in certain areas, check the screws and washers to ensure they are properly sealed.
Frequently Asked Questions (FAQ)
Q1: Can I use regular screws for polycarbonate roofing?
Regular screws are not recommended for polycarbonate roofing, as they may not provide the necessary sealing or support. Polycarbonate roof screws are specifically designed to accommodate the material’s expansion and contraction while preventing leaks.
Q2: How do I know if my polycarbonate roof screws need to be replaced?
If you notice any rust, corrosion, or damage to the screws, or if they become loose, it’s time to replace them. Regular inspection is essential to maintaining the integrity of your roofing system.
Q3: What type of screws are best for a polycarbonate roof?
Self-drilling screws are the most commonly used for polycarbonate roofing, as they are easy to install and provide a secure fit. If extra sealing is needed, consider using cap screws or silicon-sealed screws for additional protection.
Q4: How often should I check the screws on my polycarbonate roof?
It’s recommended to check the screws at least twice a year, especially after extreme weather conditions such as heavy winds or rain. Tighten any loose screws and replace any that show signs of wear.